EC100 ARM Industriecomputer Entwicklungshandbuch – The EC100 comes pre-installed with Node-RED 4.0 and NeuronEX-Lite, making it ready for edge application development out of the box.
Node-RED provides a visual, drag-and-drop programming interface for rapid business logic building, while NeuronEX-Lite serves as a lightweight edge computing platform that supports millisecond-level device connectivity through multi-protocol compatibility. This combination greatly simplifies development and enables fast deployment of industrial IoT solutions.
Development Preparation
1. SSH Tools
We recommend using MobaXterm, or you can choose your preferred SSH tool.
2. Serial port debugging tool
We recommend using XCOM or choosing your preferred serial port debugging tool.
3. Hardware Tools
Common debugging tools include: CAN-to-USB tools / 485-to-USB tools/network cables, etc. Please prepare these on your own.
4. Cross-Compilation Toolchain
Software Environment
OS: Embedded Linux 20.04.1; partially cropped
NodeJs: v22.16.0
Python: python3.8
Shell: bash
GLIBC: 2.31
Peripheral Interfaces
1. Serial Port
The EC100 comes with two built-in RS485 transceivers.
| Hardware Interface | Device File |
|---|---|
| RS485-1 | /dev/ttyS4 |
| RS485-2 | /dev/ttyS3 |
Anmerkung: With RS485 transmission and reception, users do not need to worry about switching between transmission and reception, as the hardware will handle it automatically.
1.1. Quick test
Use the minicom tool for testing. For specific usage instructions, please search Baidu or consult DeepSeek.
1.2. Code test example
#include <stdio.h>

#include <stdlib.h>

#include <string.h>

#include <unistd.h>

#include <fcntl.h>

#include <termios.h>

#include <errno.h>

#include <sys/select.h>

#define BUFFER_SIZE 256

typedef struct {

int baud_rate; // Baud rate

int data_bits; // Data bits (5,6,7,8)

int stop_bits; // Stop bits (1,2)

char parity; // Parity (N: None, O: Odd, E: Even)

} SerialConfig;

int set_serial_attr(int fd, SerialConfig *config)

{

struct termios tty;

if (tcgetattr(fd, &tty) < 0) { perror("tcgetattr"); return -1; } // Set baud rate speed_t speed;

switch (config->baud_rate) {

case 9600: speed = B9600; break;

case 19200: speed = B19200; break;

case 38400: speed = B38400; break;

case 57600: speed = B57600; break;

case 115200: speed = B115200; break;

default:

fprintf(stderr, "Unsupported baud rate, using 115200\n");

speed = B115200;

}

cfsetispeed(&tty, speed);

cfsetospeed(&tty, speed);

// Set data

bits tty.c_cflag &= ~CSIZE;

switch (config->data_bits) {

case 5: tty.c_cflag |= CS5; break;

case 6: tty.c_cflag |= CS6; break;

case 7: tty.c_cflag |= CS7; break;

case 8: tty.c_cflag |= CS8; break;

default:

fprintf(stderr, "Unsupported data bits, using 8\n");

tty.c_cflag |= CS8;

}

// Set stop bits

if (config->stop_bits == 2) {

tty.c_cflag |= CSTOPB; } else {

tty.c_cflag &= ~CSTOPB; }

// Set parity

switch (config->parity) {

case 'N':

case 'n': tty.c_cflag &= ~PARENB; // No parity

break;

case 'O':

case 'o': tty.c_cflag |= PARENB; // Odd parity

tty.c_cflag |= PARODD; break;

case 'E':

case 'e': tty.c_cflag |= PARENB; // Even parity

tty.c_cflag &= ~PARODD; break;

default:

fprintf(stderr, "Unsupported parity, using N\n");

tty.c_cflag &= ~PARENB;

}

// Other settings

tty.c_cflag |= (CLOCAL | CREAD); // Enable receiver and local mode

tty.c_cflag &= ~CRTSCTS; // Disable hardware flow control

tty.c_lflag &= ~(ICANON | ECHO | ECHOE | ISIG); // Raw input mode

tty.c_oflag &= ~OPOST; // Raw output mode

tty.c_cc[VMIN] = 1; // Minimum number of characters to read

tty.c_cc[VTIME] = 0; // Read timeout (unit: 0.1s)

if (tcsetattr(fd, TCSANOW, &tty) < 0) {

perror("tcsetattr");

return -1; }

return 0;

}

int main(int argc, char *argv[]) {

int fd;

char *portname;

if (argc < 2) {

fprintf(stderr, "Usage: %s <serial_port>\n", argv[0]);

exit(EXIT_FAILURE);

}

portname = argv[1]; // Serial port configuration

SerialConfig config = { .baud_rate = 115200, // Baud rate

.data_bits = 8, // Data bits

.stop_bits = 1, // Stop bits

.parity = 'N' // Parity (N: None, O: Odd, E: Even)

};

fd = open(portname, O_RDWR | O_NOCTTY | O_NONBLOCK);

if (fd < 0) {

perror("open");

exit(EXIT_FAILURE);

}

if (set_serial_attr(fd, &config)) {

close(fd);

exit(EXIT_FAILURE);

}

printf("Serial port echo test running on %s\n", portname);

printf("Configuration: %d baud, %d data bits, %d stop bit, %c parity\n", config.baud_rate, config.data_bits, config.stop_bits, config.parity);

printf("Press Ctrl+C to exit.\n");

fd_set readfds;

char buffer[BUFFER_SIZE];

int n;

while (1) {

FD_ZERO(&readfds);

FD_SET(fd, &readfds); // Wait indefinitely for incoming data (no timeout)

if (select(fd + 1, &readfds, NULL, NULL, NULL) < 0) {

perror("select");

break; }

if (FD_ISSET(fd, &readfds)) {

n = read(fd, buffer, BUFFER_SIZE - 1);

if (n > 0) {

buffer[n] = '\0';

printf("Received %d bytes: %s\n", n, buffer); // Echo data back

write(fd, buffer, n); } else if (n < 0) {

if (errno != EAGAIN && errno != EWOULDBLOCK) {

perror("read");

break;

}

}

}

}

close(fd);

return 0;

}
Compile: gcc rs485_example.c -o rs485_example
RS485-1 test run: ./rs485_example/dev/ttyS4
2. LED
EC100 has a total of 4 indicator lights, 2 of which can be programmed by the user.
| Hardware Interface | IO Index | IO Number | Chip Group | Notes |
|---|---|---|---|---|
| POW | / | / | / | Power indicator LED. |
| RUN | 39 | GPIO1_A7 | gpiochip1 | Reserved by internal firmware; not user-programmable; blinks during normal operation. |
| LED1 | 38 | GPIO1_A6 | gpiochip1 | User-programmable. |
| LED2 | 36 | GPIO1_A4 | gpiochip1 | User-programmable. |
Note: The IO index is calculated based on the IO number.
2.1. Quick test
#!/bin/bash

# Check if a GPIO index is provided
if [ -z "$1" ]; then
echo "Usage: $0 <gpio_number>"
exit 1
fi

GPIO=$1
GPIO_PATH="/sys/class/gpio/gpio$GPIO"
EXPORT_PATH="/sys/class/gpio/export"

# Check if the GPIO is already exported
if [ ! -d "$GPIO_PATH" ]; then
echo "Exporting GPIO $GPIO..."
echo "$GPIO" > "$EXPORT_PATH"
if [ $? -ne 0 ]; then
echo "Failed to export GPIO $GPIO. Check permissions or if it's in use."
exit 1
fi
else
echo "GPIO $GPIO is already exported."
fi

# Set GPIO direction to output
echo "out" > "$GPIO_PATH/direction"

# Set the initial value to low
echo 0 > "$GPIO_PATH/value"

echo "Toggling GPIO $GPIO every 1 second. Press Ctrl+C to stop."

# Start toggle loop
while true; do
echo 1 >"$GPIO_PATH/value"
sleep 1
echo 0 >"$GPIO_PATH/value"
sleep 1
done
Test run: bash led_example.sh 38
2.2. Code test example
#include <stdio.h>
#include <stdlib.h>
#include <string.h>
#include <unistd.h>
#include <fcntl.h>
#include <sys/ioctl.h>
#include <linux/gpio.h>
#include <errno.h>
#define GPIO_CHIP "/dev/gpiochip1" // Use gpiochip1
#define GPIO_LINE 38%32 // Offset of the GPIO to control within chip1
#define PERIOD_US 500000 // Period time (microseconds)
int main() {
struct gpiohandle_request req;
struct gpiohandle_data data;
int fd, ret;
// Open the GPIO character device
fd = open(GPIO_CHIP, O_RDWR);
if (fd < 0) {
perror("Failed to open GPIO device");
return EXIT_FAILURE;
}
// Configure GPIO request
memset(&req, 0, sizeof(req));
req.lineoffsets[0] = GPIO_LINE; // GPIO line number
req.flags = GPIOHANDLE_REQUEST_OUTPUT; // Set as output mode
req.default_values[0] = 0; // Initial value set to low
strcpy(req.consumer_label, "gpio-toggle"); // Consumer label
req.lines = 1; // Number of GPIO lines to control
// Request GPIO control
ret = ioctl(fd, GPIO_GET_LINEHANDLE_IOCTL, &req);
if (ret < 0) {
perror("Failed to get GPIO handle");
close(fd);
return EXIT_FAILURE;
}
// Close GPIO character device (we already have line handle)
close(fd);
printf("Controlling GPIO chip1 line %d, period %.1f seconds...\n", GPIO_LINE, PERIOD_US/1000000.0);
// Periodically toggle GPIO level
while (1) {
data.values[0] = 1; // High level
ret = ioctl(req.fd, GPIOHANDLE_SET_LINE_VALUES_IOCTL, &data);
if (ret < 0) {
perror("Failed to set GPIO high level");
break;
}
usleep(PERIOD_US/2);
data.values[0] = 0; // Low level
ret = ioctl(req.fd, GPIOHANDLE_SET_LINE_VALUES_IOCTL, &data);
if (ret < 0) {
perror("Failed to set GPIO low level");
break;
}
usleep(PERIOD_US/2);
}
// Close GPIO line handle
close(req.fd);
return EXIT_SUCCESS;
}
Compile: gcc led_example.c -o led_example
Test run: ./led_example
3. CAN FD
EC100 has two high-speed CAN interfaces
| Hardware Interface | Netzwerk-Schnittstelle |
|---|---|
| CAN1 [H1 L1] | can0 |
| CAN2 [H2 L2] | can1 |
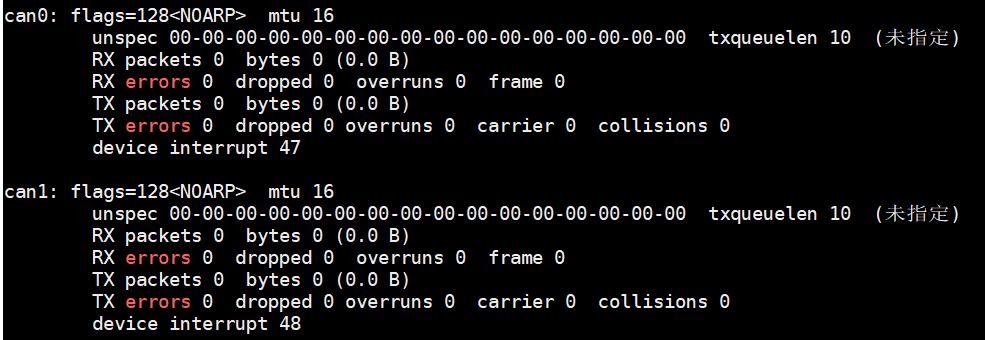
3.1. Quick test
Connect can0 and can1, command line test:
#Initialize can0 and can1 first, select baud rate 500k, use canfd, then select can0 to receive data and can1 to send data

ip link set can0 down

ip link set can1 down

ip link set can0 type can bitrate 500000 sample-point 0.8 dbitrate 2000000 sample-point 0.8 fd on

ip link set can1 type can bitrate 500000 sample-point 0.8 dbitrate 2000000 sample-point 0.8 fd on

ip link set can0 up

ip link set can1 up

echo 4096 > /sys/class/net/can0/tx_queue_len

echo 4096 > /sys/class/net/can1/tx_queue_len

candump can0 &

cansend can1 001234EF#00.11.22.33.44.55.66.77
3.2. Example of code testing
#include <stdio.h>
#include <stdlib.h>
#include <string.h>
#include <unistd.h>
#include <net/if.h>
#include <sys/ioctl.h>
#include <sys/socket.h>
#include <linux/can.h>
#include <linux/can/raw.h>
#include <fcntl.h>
#include <errno.h>
#include <stdint.h>

#define CAN_INTERFACE "can0"
#define BITRATE 500000
#define DATA_BITRATE 2000000
#define SAMPLE_POINT 0.8
#define TX_QUEUE_LEN 4096

// Configure CAN FD interface
int setup_can_fd_interface(const char *ifname) {
char cmd[512];
FILE *fp;

// Bring the interface down
snprintf(cmd, sizeof(cmd), "ip link set %s down", ifname);
system(cmd);

// Set CAN FD parameters
snprintf(cmd, sizeof(cmd),
"ip link set %s type can bitrate %d sample-point %.1f "
"dbitrate %d dsample-point %.1f fd on",
ifname, BITRATE, SAMPLE_POINT, DATA_BITRATE, SAMPLE_POINT);
if (system(cmd) != 0) {
fprintf(stderr, "Failed to configure CAN FD interface %s\n", ifname);
return -1;
}

// Set TX queue length
snprintf(cmd, sizeof(cmd), "/sys/class/net/%s/tx_queue_len", ifname);
fp = fopen(cmd, "w");
if (fp == NULL) {
perror("Failed to open tx_queue_len");
return -1;
}
fprintf(fp, "%d", TX_QUEUE_LEN);
fclose(fp);

// Bring the interface up
snprintf(cmd, sizeof(cmd), "ip link set %s up", ifname);
if (system(cmd) != 0) {
fprintf(stderr, "Failed to bring up CAN interface %s\n", ifname);
return -1;
}

printf("CAN FD interface %s configured:\n", ifname);
printf(" Bitrate: %d\n", BITRATE);
printf(" Data bitrate: %d\n", DATA_BITRATE);
printf(" Sample point: %.1f\n", SAMPLE_POINT);
printf(" TX queue length: %d\n", TX_QUEUE_LEN);

return 0;
}

// Send a CAN FD frame
int send_can_fd_frame(int sock, uint32_t can_id, uint8_t *data, uint8_t len) {
struct canfd_frame frame;

memset(&frame, 0, sizeof(frame));
frame.can_id = can_id;
frame.len = len;
memcpy(frame.data, data, len);
frame.flags = CANFD_BRS; // Enable bit rate switching

int nbytes = write(sock, &frame, sizeof(frame));
if (nbytes != sizeof(frame)) {
perror("CAN FD frame send failed");
return -1;
}

printf("Sent CAN FD frame: ID 0x%08X, data: ", can_id);
for (int i = 0; i < len; i++) {
printf("%02X ", data[i]);
}
printf("\n");

return 0;
}

// Receive CAN messages (supports classic CAN and CAN FD)
void receive_can_messages(int sock) {
struct canfd_frame frame;
int nbytes;

printf("Starting to receive CAN messages (Ctrl+C to stop)...\n");

while (1) {
nbytes = read(sock, &frame, sizeof(frame));
if (nbytes < 0) {
if (errno == EAGAIN || errno == EWOULDBLOCK) {
continue;
}
perror("CAN frame read failed");
break;

}

if (nbytes == CAN_MTU) {
// Classic CAN frame
printf("Received CAN frame: ID 0x%08X, DLC %d, data: ",
frame.can_id, frame.len);
}else if (nbytes == CANFD_MTU) {
// CAN FD frame
printf("Received CAN FD frame: ID 0x%08X, DLC %d, data: ",
frame.can_id, frame.len);
}else {

printf("Received frame with unexpected size %d\n", nbytes);
continue;
}

for (int i = 0; i < frame.len; i++) {
printf("%02X ", frame.data[i]);
}
printf("\n");
}
}

int main() {
int s;
struct sockaddr_can addr;
struct ifreq ifr;

// Configure CAN FD interface
if (setup_can_fd_interface(CAN_INTERFACE) < 0) {
return 1;
}

// Create socket
if ((s = socket(PF_CAN, SOCK_RAW, CAN_RAW)) < 0) {
perror("Socket creation failed");
return 1;
}

// Enable CAN FD support
int enable_canfd = 1;
if (setsockopt(s, SOL_CAN_RAW, CAN_RAW_FD_FRAMES, &enable_canfd, sizeof(enable_canfd)) < 0) {
perror("Failed to enable CAN FD support");
close(s);
return 1;
}

// Specify CAN interface
strcpy(ifr.ifr_name, CAN_INTERFACE);
if (ioctl(s, SIOCGIFINDEX, &ifr) < 0) {
perror("IOCTL SIOCGIFINDEX failed");
close(s);
return 1;
}

// Bind socket to CAN interface
addr.can_family = AF_CAN;
addr.can_ifindex = ifr.ifr_ifindex;
if (bind(s, (struct sockaddr *)&addr, sizeof(addr))< 0) {
perror("Bind failed");
close(s);
return 1;
}

// Send test CAN FD frame (ID 0x001234EF, data 00.11.22.33.44.55.66.77)
uint8_t test_data[] = {0x00, 0x11, 0x22, 0x33, 0x44, 0x55, 0x66, 0x77};
if (send_can_fd_frame(s, 0x001234EF, test_data, sizeof(test_data)) < 0) {
close(s);
return 1;
}

// Start receiving CAN messages
receive_can_messages(s);

close(s);
return 0;
}
Compilation: gcc can_example.c -o can_example
Test run: ./can_example
4. Buttons
EC100 buttons: Internal program occupied, used for restarting or resetting the device’s web page-related configuration
Restart: Press for 1 second and release
Reset + restart: Press for >5 seconds
5. Hardware Watchdog
The EC100 hardware watchdog is enabled by default and managed by the internal program.
Watchdog cycle: <30 seconds
Note: If the internal program is stopped, you must manually take over the watchdog feeding service; otherwise, the device will reboot periodically.
6. Network Ports
The network ports are divided into WAN and LAN ports, managed by the internal network program; configuration must be done via the web interface. For details, please refer to:
This is a Yuque content card, click the link to view: https://iotrouter.yuque.com/zn3vdn/ec/go5fnig7b5xumq79?singleDoc
7. Cellular Wireless
The EC100 supports 4G communication (4G version); module identification and dialing are managed by the internal program, and users do not need to concern themselves with this. For details, please refer to:
This is a Yueque content card; click the link to view: https://iotrouter.yuque.com/zn3vdn/ec/go5fnig7b5xumq79?singleDoc
Software Applications
1. Internal Management Program
To simplify user experience, the EC100 is equipped with the built-in management program iotrouter, which automatically starts at boot. The management program includes, but is not limited to, the following functions:
- Device Initialization
- Network Management
- Watchdog
- Button Monitoring
- Firewall
- Device Configuration Service (default port 80; listening port can be changed; file: /usr/local/src/iotrouter/web/user-config.js)
- User File Browsing Function (default path /home; path can be changed; file: /usr/local/src/iotrouter/web/user-config.js)
Note: Internal programs must remain active; otherwise, the device may fail to boot normally. If users must disable internal management programs, they must take over the aforementioned management program services themselves.
2. NeuronEX
The EC100 is pre-installed with NeuronEX-Lite, which starts automatically at boot and listens on port 8085. For more details, see:
This is a Yuque content card; click the link to view: https://iotrouter.yuque.com/zn3vdn/ec/hdsb71i79vmfr8wd?singleDoc
- Check service status: systemctl status neuronex
- Restart service: systemctl restart neuronex
- Stop service: systemctl stop neuronex
- Disable service startup: systemctl disable neuronex
3. Node-RED
EC100 has built-in Node-RED, which starts automatically at boot and listens on port 1880. For more details, see:
This is a Yueque content card. Click the link to view: https://iotrouter.yuque.com/zn3vdn/ec/hdsb71i79vmfr8wd?singleDoc
- Check service status: systemctl status node-red
- Restart service: systemctl restart node-red
- Stop service: systemctl stop node-red
- Disable service auto-start: systemctl disable node-red
4. User-developed programs
User programs are developed freely by users and run independently, but users must manage memory and storage space to avoid system abnormalities. Software can be added to the system’s auto-start method:
- /etc/rc.local
- systemd service
- /etc/init.d system
Our company also provides customized software development services. Please consult our sales staff if you have any needs.
Image burning
When is image burning used? When using the device, users may accidentally delete system core files, incorrectly modify system configuration parameters (such as critical registry entries), or accidentally format the system partition, resulting in the system being unable to boot or functioning abnormally. In such cases, burning the system image for the corresponding device can quickly restore the system to its initial normal state.
1. Burning tools
The burning toolkit is large; please contact technical support or sales to obtain it.
Driver: Driver
Tool: Burning tool
*.img: Factory image

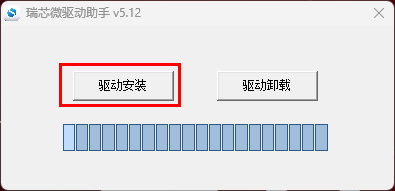
2. Driver installation
Install: \DriverDriverInstall.exe
3. Burning
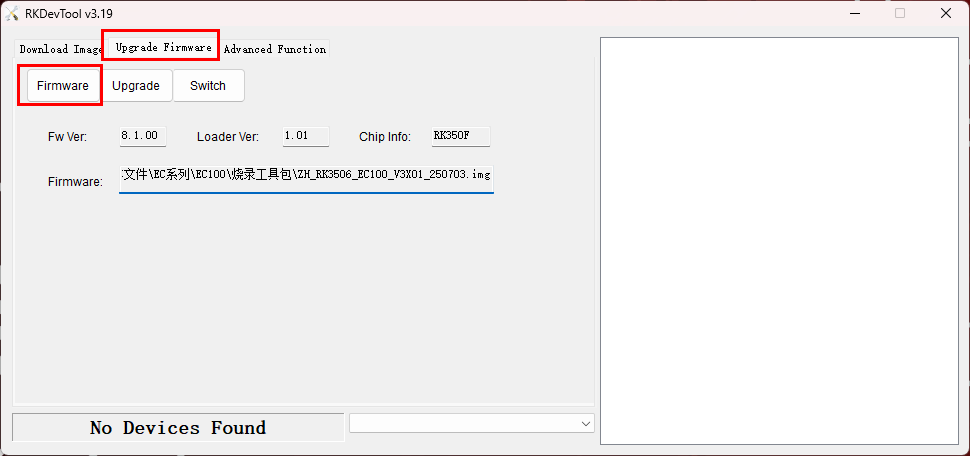
- Open \tool\RKDevTool.exe.
- Click Upgrade Firmware to jump to the burning interface.
- Click Firmware to select the image.
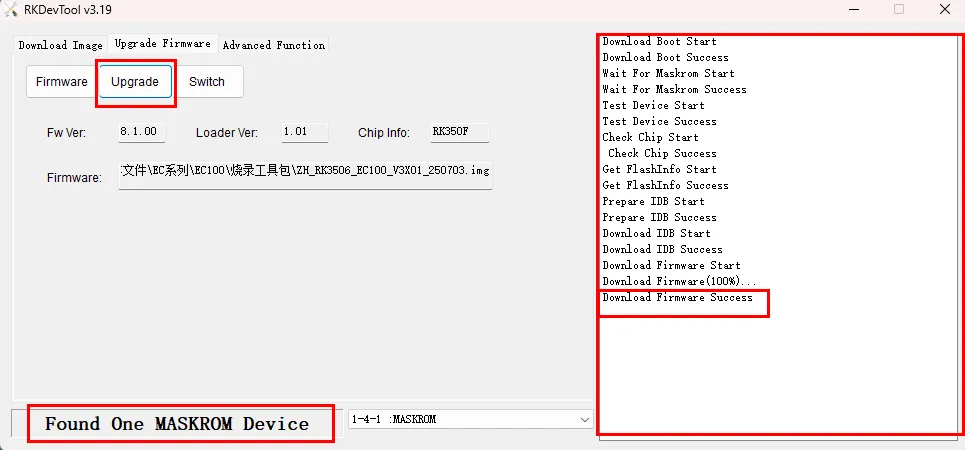
Short-circuit the watchdog of EC100 (the watchdog must be short-circuited during the burning process; the device will restart indefinitely).
Press and hold the download button to power up EC100.
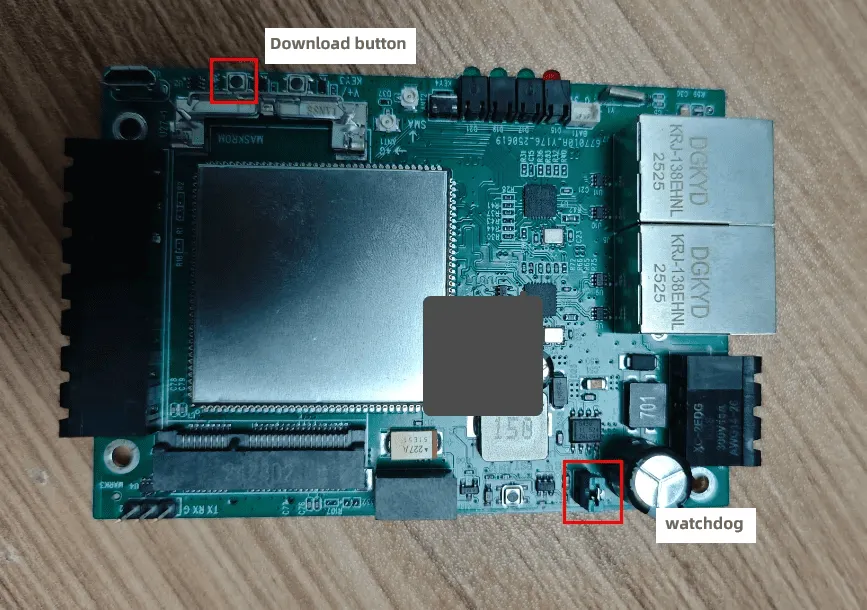
When burning, “Found One MASKROM Device” will appear below, indicating that the device has been recognized.
Click “Upgrade” to start burning, and the burning log will appear in the log window on the right.
The last line will show “Success”, indicating that the burning was successful.
